

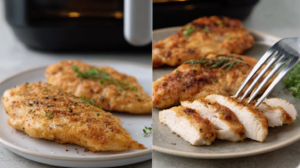
Thin Chicken Breast Air Fryer recipes have transformed the way chicken enthusiasts enjoy their meals, offering a quick and efficient cooking method that doesn’t compromise on taste or texture. In today’s fast-paced world, convenience is paramount, and air frying thin chicken breasts delivers just that, along with a host of health benefits.
Our mission is to empower you with the knowledge needed to master this technique, ensuring each meal is prepared with care and precision. By combining this innovative appliance with carefully selected seasonings and professional tips, you can achieve a dish that’s not only nutritious but also delightfully satisfying for yourself and your guests.
Table of Contents
How to Prepare Thin Chicken Breast for the Air Fryer
Ingredients
- Thin chicken breasts
- Olive oil or cooking spray
- Salt and pepper
- Your choice of seasonings or marinade
Preparation Steps
- Trim and Rinse:
- Start by trimming any excess fat from the chicken breasts.
- Rinse the chicken under cold water and pat dry with paper towels.
- Pound the Chicken:
- Place each chicken breast between two pieces of plastic wrap or inside a sealable plastic bag.
- Use a meat mallet or rolling pin to pound the chicken to an even thickness, about ½ inch thick.
- Season or Marinate:
- Lightly coat the chicken with olive oil or cooking spray to help the seasoning stick and promote a crispy texture.
- Season the chicken with salt, pepper, and any desired additional seasonings or marinades.
- Preheat the Air Fryer:
- Preheat your air fryer to 375°F (190°C) for 3-5 minutes. This ensures the chicken starts cooking immediately, locking in moisture.
By following these straightforward steps, you can prepare thin chicken breasts that will come out perfectly cooked and flavorful in your air fryer.
Thin Chicken Breast Air Fryer Step-by-Step Recipe
Creating the perfect air-fried thin chicken breast is easier than you think. Follow these steps to culinary success:
- Prepare the Chicken: Gently pound the chicken breasts to an even thickness and pat dry. Marinate as desired to infuse flavors.
- Preheat the Air Fryer: Set your air fryer to 400°F and allow it to preheat for about 5 minutes.
- Oil and Season: Lightly coat the chicken with olive oil and season with salt, pepper, and any herbs or spices you prefer.
- Arrange in Basket: Place the chicken breasts in the air fryer basket, ensuring they are not overlapping for even cooking.
- Cook: Air fry the chicken at 400°F for approximately 8-10 minutes, flipping halfway through to ensure even browning.
- Check Doneness: Use a meat thermometer to ensure the internal temperature of the chicken reaches 165°F for safety.
- Rest and Serve: Allow the chicken to rest for a few minutes before slicing to retain juices. Serve with your favorite sides and enjoy!
Cooking Thin Chicken Breast in the Air Fryer Without Breading: A Healthy Option
If you’re seeking a health-conscious alternative to traditional fried chicken, opting for air-fried thin chicken breast without breading is an excellent choice. Here’s how you can achieve a flavorful result with minimal steps:
- Select Quality Chicken: Choose fresh, high-quality chicken breasts, either organic or free-range for a more robust flavor.
- Prepare the Chicken: Begin by gently pounding the chicken to ensure it is of uniform thickness, which promotes even cooking.
- Marinate for Flavor: Create a simple, healthy marinade using ingredients like olive oil, lemon juice, garlic, and fresh herbs. Let the chicken marinate for at least 30 minutes to allow the flavors to penetrate.
- Preheat the Air Fryer: Set your air fryer to 400°F and preheat for around 5 minutes. Preheating is crucial for achieving a crispy exterior.
- Lightly Coat with Oil: Even though you’re skipping the breading, a light coating of olive oil helps in browning and prevents the chicken from sticking to the fryer basket.
- Season Your Chicken: Sprinkle your marinated chicken breasts with salt, pepper, and any preferred spices before placing them in the air fryer.
- Cook to Perfection: Place the chicken in the air fryer basket in a single layer. Cook at 400°F, flipping halfway through cooking, for about 8-10 minutes, until the internal temperature reaches 165°F.
- Rest Before Serving: Let the chicken rest for a few minutes post-cooking. This step allows the juices to redistribute, ensuring every bite is tender and succulent.
Enjoy your air-fried chicken as a main course, or slice it up to top salads, sandwiches, or grain bowls for a nutritious meal component.
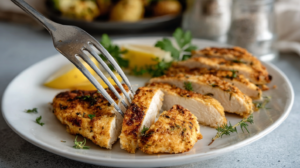
How to Achieve Crispy Thin Chicken Breast Without Breading in the Air Fryer
Achieving a crispy, flavorful chicken breast without breading is possible with the right technique and ingredients. Here’s how:
Choose the Right Seasonings
- Opt for bold spices like paprika, garlic powder, onion powder, and black pepper.
- Consider adding herbs such as rosemary or thyme for an aromatic touch.
- Adjust the seasoning to cater to personal taste preferences or dietary needs.
Prepare the Chicken
- Pound to Even Thickness: Use a mallet to ensure uniform thickness for even cooking.
- Pat Dry: Remove any excess moisture with paper towels to help achieve a crispier texture.
Use a Light Oil Coating
- Apply a light coat of high smoke point oil, such as olive or avocado oil, to promote browning and crispiness.
- Ensure the oil is spread evenly across all surfaces of the chicken for consistent results.
Air Fryer Technique
- Preheat the Air Fryer: Set the air fryer to 400°F and allow it to preheat for about 5 minutes.
- Arrange Properly: Place the chicken in a single layer in the basket to facilitate air circulation.
- Shake or Flip: Halfway through cooking, shake the basket or flip the chicken to ensure even browning.
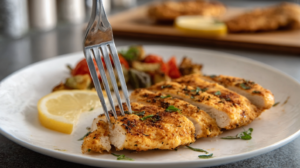
Finish with a Squeeze of Lemon
- Add a squeeze of fresh lemon juice post-cooking to enhance flavor and offer a bright finish.
- This step also adds a layer of freshness that complements the spices and retains moisture.
Air Fryer Thin Chicken Breast Recipe Simple and Delicious
Simplifying your cooking routine doesn’t mean sacrificing flavor. This straightforward recipe for air fryer thin chicken breast delivers delicious results with minimal effort.
- Ingredients:
- 2 thin chicken breasts
- 1 tablespoon olive oil
- Salt and pepper to taste
- 1 teaspoon garlic powder
- 1 teaspoon paprika
- Instructions:
- Preheat your air fryer to 400°F.
- Pat chicken breasts dry and coat with olive oil.
- Season with salt, pepper, garlic powder, and paprika.
- Place in the air fryer basket in a single layer.
- Cook for 8-10 minutes, flipping halfway through.
- Ensure an internal temperature of 165°F before serving.
This recipe offers a blend of simplicity and flavor, making it perfect for weeknight dinners or meal prep.
Thin Chicken Breast Air Fryer No Flour No Problem
Cooking without flour doesn’t mean sacrificing flavor or texture. In fact, air frying thin chicken breasts without flour can result in a lighter, healthier meal without compromising on taste.
To enhance the flavor, experiment with different herbs and spices. Try a mixture of Italian seasoning, lemon zest, and freshly cracked black pepper for a Mediterranean twist. These seasonings complement the chicken’s natural flavors beautifully.
For an added crunch, consider tossing the chicken in crushed cornflakes or panko breadcrumbs before air frying. These alternatives offer a delightful crunch without the heaviness of traditional flour coatings, providing a satisfying texture without extra calories.
Health Benefits of Air Fryer Chicken
Cooking thin chicken breasts in an air fryer offers numerous health advantages that make it a preferred choice for health-conscious individuals. Here are seven key benefits:
- Reduced Fat Intake: By using an air fryer, the amount of oil needed is significantly less than traditional frying methods, which helps lower overall fat consumption and calorie intake.
- Retained Nutrients: The rapid cooking method of air frying helps retain more essential nutrients within the chicken, ensuring you get the most from your meal.
- Lower Carcinogen Formation: Air frying reduces the risk of forming harmful compounds such as acrylamide, which can occur with high-temperature cooking methods like deep frying.
- Controlled Portion Sizes: Cooking smaller portions like thin chicken breasts allows for better control of portion sizes, which aids in managing caloric intake and supports weight management goals.
- Versatile and Flavorful: Without the need for flour or heavy batter, air-fried chicken can be seasoned with a variety of spices and herbs, making it easy to enhance flavor without added fat or calories.
- Heart-Healthy Option: The use of heart-friendly oils like olive or avocado oil contributes to healthier cholesterol levels, promoting cardiovascular health.
- Easy Digestibility: Air frying results in a lighter meal that is easier on the digestive system, compared to the heaviness typically associated with deep-fried foods.
Air Fryer Chicken Breast Calorie Comparison
When considering healthier cooking options, understanding the calorie content of your meals is crucial. Here’s a quick comparison of calorie counts across different cooking methods for thin chicken breasts:
|
Cooking Method |
Calories* |
|---|---|
|
Air Fryer |
120 kcal |
|
Oven-Baked |
150 kcal |
|
Pan-Fried |
220 kcal |
|
Deep-Fried |
350 kcal |
*These values are approximate and based on a 100-gram serving of cooked chicken breast. The actual calorie count can vary depending on the specific ingredients and amounts used in preparation.
How Long to Cook Chicken Breast in Air Fryer at 400°F for Perfect Results
To ensure your chicken breast is perfectly cooked every time, follow these guidelines:
- Thickness Matters: Thicker chicken breasts will require more time, approximately 12-15 minutes, compared to 8-10 minutes for thin slices. Always consider the size and adjust accordingly.
- Single Layer Cooking: Arrange the chicken breasts in a single layer within the air fryer basket. This promotes even cooking by allowing hot air to circulate around each piece effectively.
- Temperature Check: Regardless of time, the internal temperature is the most reliable indicator of doneness. Use a digital meat thermometer to verify that the thickest part of the chicken reaches 165°F.
- Adjust as Needed: Depending on the make and model of your air fryer, cooking times may vary slightly. After reaching the recommended time, if needed, continue cooking in short 1-2 minute increments, checking the temperature frequently.
By following these steps, you can achieve tender, juicy chicken breasts with a perfect texture, creating a delightful meal every time.
Air Fryer Thin Chicken Breast Breading Techniques for Extra Crunch
Achieving an extra crunch on your thin chicken breast in an air fryer can elevate your dish and satisfy that craving for texture and flavor. Explore the following breading techniques to enhance your cooking:
Classic Panko Coating
- Ingredients:
- Panko breadcrumbs
- Eggs or buttermilk for binding
- Technique:
- Lightly beat the eggs or use buttermilk in a bowl.
- Dip each chicken breast into the egg mixture, ensuring an even coat.
- Press the chicken into panko breadcrumbs, covering completely for a uniform crust.
Parmesan Herb Crust
- Ingredients:
- Freshly grated Parmesan cheese
- Mixed dried Italian herbs (such as oregano, basil, and rosemary)
- Technique:
- Combine Parmesan and herbs in a shallow dish.
- Coat chicken with a small amount of olive oil.
- Press the chicken into the mixture, ensuring an even distribution of cheese and herbs.
Cornflake Crumble
- Ingredients:
- Crushed cornflakes
- Salt and pepper to taste
- Technique:
- Season the chicken with salt and pepper.
- Dip into an egg wash for adhesion.
- Coat thoroughly in crushed cornflakes, pressing gently.
Nutty Alternative
- Ingredients:
- Crushed almonds or pecans
- Honey or maple syrup for binding
- Technique:
- Brush chicken with a light layer of honey or syrup.
- Dip into crushed nuts, pressing to adhere.
- Optionally, sprinkle with cayenne for heat.
Implement these techniques to bring a delicious and satisfying crunch to your air-fried chicken, while being mindful of maintaining a customer-focused approach by adjusting seasonings to suit diverse tastes and preferences.
Thin Chicken Breast Air Fryer Cooking Tips for Tenderness
To ensure your thin chicken breast remains tender and flavorful, follow these expert tips:
- Marinate Before Cooking:
- Use a combination of acidic ingredients like lemon juice or vinegar to tenderize the chicken.
- Allow the chicken to marinate for at least 30 minutes for optimal tenderness.
- Pound the Chicken Evenly:
- Flatten the chicken breasts to an even thickness for consistent cooking.
- This helps prevent drying out or overcooking thinner parts of the breast.
- Use a Meat Thermometer:
- Always check that the internal temperature reaches 165°F.
- This guarantees the chicken is tender, juicy, and safe to eat.
- Avoid Overcooking:
- Stick to recommended cooking times and temperatures for the best results.
- Consider slightly reducing the cooking time to maintain juiciness.
- Let It Rest:
- Allow the chicken to rest for a few minutes before slicing.
- This helps redistribute juices, resulting in more tender meat.
- Experiment with Cooking Techniques:
- Try different techniques, like adding a small amount of broth or water in the basket.
- This can create steam, ensuring a moist cooking environment.
Implementing these techniques can elevate your air fryer chicken breast, ensuring a tender and delicious meal each time.
Conclusion
The air fryer has revolutionized the way we cook, making it easier than ever to achieve restaurant-quality results at home. Thin chicken breasts cooked in an air fryer offer a delectable balance of tenderness and crispiness, perfect for any meal occasion.
By understanding the nuances of time, temperature, and preparation, you can master the art of air frying thin chicken breast. Whether you prefer it breaded or bare, seasoned or marinated, the air fryer provides a convenient and healthy way to enjoy this versatile protein.
Ready to elevate your cooking game? Explore our air fryer recipes and discover new ways to enjoy your favorite dishes. Happy cooking!
FAQs
Can I cook frozen thin chicken breast in an air fryer?
Yes, cooking frozen thin chicken breast in an air fryer is possible and can save you time on busy days. Be aware that cooking from frozen will require a longer time, usually about 15-18 minutes at 390°F. It’s essential to check the internal temperature to ensure it reaches the safe 165°F mark.
What’s the best way to ensure my air fryer chicken breast is crispy?
To achieve a crispy texture, lightly spray the chicken with oil and ensure the air fryer is preheated before cooking. Bread the chicken using seasoned flour and breadcrumbs, and avoid overcrowding the basket to allow hot air to circulate efficiently.
How do I keep my chicken breast from drying out in the air fryer?
To prevent dryness, marinate the chicken to add moisture and flavor, and monitor the cooking closely using a meat thermometer. Also, letting the chicken rest for a few minutes after cooking helps to retain its natural juices.
Is it necessary to flip the chicken during cooking?
Flipping the chicken halfway through cooking is recommended for even browning and thorough cooking. This step helps ensure both sides have equal exposure to the circulating air, enhancing crispiness.
Can I cook chicken breast with the skin on in an air fryer?
Yes, you can air fry chicken breast with the skin on. The skin will become nicely crispy if you apply a light spray of oil and season it well. Remember to adjust the cooking time slightly as the skin may increase the cooking duration to achieve the desired crispiness.