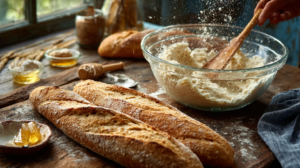
Unveiling The Simple Baguette Recipe: Your Artisanal Journey

by Spicyrranny
Unveiling The Simple Baguette Recipe: Your Artisanal Journey

Imagine the allure of a Parisian bakery, with the aroma of freshly baked bread wafting through the air and golden baguettes cooling on rustic wooden racks. Could you recreate this scene in your very own kitchen? In this definitive, step-by-step guide to baking your own baguettes, you’ll learn all the tips and tricks to create the perfect long, crusty loaf that’s tender on the inside. Whether you’re an experienced home baker or just starting your culinary adventure, this simple baguette recipe will guide you to baguette brilliance.

The History and Origin of the Baguette

It’s impossible to separate the simple baguette recipe from its rich cultural history. The iconic French bread is not just a staple food; it’s a symbol of community and tradition. The baguette as we know it today has only been around for a little over a century. Before the 20th century, there were several versions of long thin bread in France, but the word “baguette” did not appear in popular literature until the 1920s. It’s believed that the elongated form we now associate with a baguette was a product of technical advancements in bread-making around that time.

Understanding the Ingredients for a Simple Baguette

The complexity of a baguette recipe profile is surprising given its simple list of ingredients. Flour, water, yeast, and salt – sometimes a bit of sugar for balance. But the art lies in the quality and quantity of each. We recommend using high-quality flour, as it is the backbone of your baguette. French bakeries use refined and light white flour called “Type 55.” However, you can achieve similar results using a bleached all-purpose flour.

Flour

The choice of flour is critical. Look for a strong, high-protein flour. Bread flour is a good option for its higher protein content, which gives bread its chewy texture and ensures the baguette will rise correctly.

Water

A perfect baguette is around 68% to 75% water. The right hydration is essential for maintaining the gluten structure and creating those large air pockets within the finished loaf. Use filtered or spring water for the best results.

Yeast

You have a choice between fresh, active dry, or instant yeast. Instant yeast doesn’t require activation and can be added directly to the dry ingredients. Ensure the yeast is fresh for the best rise.

Salt

Salt not only enhances the flavor but also slows the activity of the yeast, allowing for a more controlled fermentation. You only need a little – about 2% of the flour weight.

Sugar (Optional)

This addition is a personal choice but can add a slight sweetness and can help the crust brown more rapidly.

Preparing Your Kitchen for Baguette Baking

Bread-making requires some preparation. You’ll need a few tools:

Ingredients

Have all your ingredients measured out and ready. This ensures you don’t disrupt the mixing process.

Mixing Bowl and Spoon

A large mixing bowl and a wooden spoon for the initial mixing will do.

Stand Mixer (Optional)

While a mixer isn’t needed, it can save considerable effort in the kneading process.

Baking Sheet

You’ll need a baking sheet or baguette pan for shaping and baking the loaves.

Couche or Floured Towels

A couche is a flax linen cloth used for proving and keeping the shape of the baguette. You can also use floured kitchen towels, ensuring they are lint-free.

Lame or Sharp Knife

A lame is a baker’s blade specially designed for scoring the baguette. A very sharp knife will also work.

Spray Bottle

A spray bottle filled with water is used to create steam in the oven, which aids in the baguette’s rise and develops the crust.

Oven and Baking Stone (Optional)

Using a baking stone will help achieve a professional crusty exterior to the baguette.

Now that your kitchen is fully equipped, it’s time to start baking!

Step 1: Mixing the Dough

The first step in your baguette adventure is creating the dough:

Ingredients

  • 500g bread flour (about 3½ cups)
  • 7g instant yeast (2¼ teaspoons)
  • 375ml warm water (11/2 cups), about 105°F to 115°F
  • 1½ teaspoons salt
  • 1 teaspoon sugar (optional)

Instructions

  1. In a large mixing bowl (or the bowl of your stand mixer), combine the warm water and sugar. Sprinkle the yeast on top and allow it to sit for about 5 minutes or until frothy.
  2. Add the flour and salt to the bowl and mix until a shaggy dough forms.
  3. If using a stand mixer, knead the dough with a dough hook attachment on medium-low speed for about 6-8 minutes, or until the dough is smooth and elastic. If kneading by hand, turn the dough out onto a floured surface and knead for about 10 minutes.
  4. The dough should be tacky but not sticky to the touch. If it’s too sticky, add more flour, a tablespoon at a time, until it reaches the right consistency.
  5. Place the dough in a large, lightly greased bowl. Cover with a clean towel or plastic wrap and allow it to rise until doubled in size (about 1 hour).

Step 2: Kneading the Dough

Kneading is a vital part of the bread-making process. It develops the gluten, which gives bread its structure and helps it rise. Knead until the dough is smooth and springy to the touch. Here’s how to knead by hand:

  1. Turn the dough out onto a lightly floured surface.
  2. Fold the dough in half towards you.
  3. Push the dough away with the heel of your hand.
  4. Give the dough a quarter turn and repeat.
  5. Continue folding, pushing, and turning for about 10 minutes, or until the dough is smooth and elastic.

If using a stand mixer, this step is simplified. You’ll need to knead the dough for the time recommended in the recipe using the dough hook attachment.

Step 3: First Rise of the Dough

This is known as the fermentation phase where the yeast is working its magic.

  1. Lightly grease a clean bowl with oil or cooking spray.
  2. Place the kneaded dough into the bowl, turning once to coat.
  3. Cover the bowl with a damp cloth or plastic wrap and set it in a warm place to rise.
  4. Wait until the dough doubles in size. This might take 1-2 hours, depending on the ambient temperature.

Step 4: Shaping the Baguette

It’s time to transform the pillowy dough into the long, characteristic form of the baguette. Here’s how:

  1. Turn the dough out onto an unfloured surface. This will give you enough grip to shape the baguette properly.
  2. Press down gently to deflate the dough and shape it into a rough rectangle.
  3. Starting at one edge, fold the dough over 2/3 of the way.
  4. Press gently to seal it.
  5. Turn the dough a quarter turn and repeat the folding and sealing process.
  6. Roll the dough into a tight log, about 14 inches long.
  7. Pinch the seam and the ends to seal.

Note:

It’s crucial to create surface tension. This will help the baguette rise properly and create those beautiful cracks in the crust.

Step 5: Second Rise of the Baguette

The second rising, or the proofing, is important for the baguette’s structure.

  1. Dust a baker’s couche or a floured kitchen towel with flour.
  2. Place the shaped baguette onto the couche, seam side up.
  3. Cover the baguette with the edges of the couche or towel.
  4. Allow it to rise until puffy and nearly doubled in size, about 45 minutes to 1 hour.

Step 6: Preheating the Oven

Preheat your oven to 450°F (230°C). If you’re using a baking stone, place it in the oven as it preheats.

Note:

The key to a fabulous crust is steam. There are a few ways to achieve this. You can place a metal pan on the bottom rack of the oven and throw in a few ice cubes as the loaves go in. Alternatively, use a spray bottle to mist the loaves before and during the first 10 minutes of baking. For best results, you may also wish to spritz the sides of the oven with water.

Step 7: Scoring the Baguette

Scoring is the process of slicing the top of the bread before baking. It allows the dough to expand during baking without tearing randomly, and it adds an aesthetic touch.

  1. Using a sharp blade, make a series of quick slashes along the top of the baguette at a 30-degree angle, about ½ inch deep.
  2. Parallel lines work well, but you can also try a tic-tac-toe pattern for a classic look.

Note:

Scoring can take practice. The blade should be sharp, and the movement swift and confident. While this step is optional, it helps the baguette cook more evenly and can result in a better rise and finish.

Step 8: Baking the Baguette

Now it’s time to put your baguette in the oven.

  1. Place the baguette onto a baking sheet, transfer to the oven, and pour a cup of hot water into the metal pan beneath.
  2. Immediately shut the oven door to trap the steam.
  3. Bake for 20-25 minutes, or until the baguette is golden brown and crisp.
  4. Rotate the pan halfway through for an even bake if you’re not using a stone.

Step 9: Cooling the Baguette

Remove the baguette from the oven and place it on a wire rack to cool. Allow it to rest for at least 15 minutes before slicing.

Note:

It’s tempting to eat the baguette right away, but the cooling phase is crucial. It lets the bread finish cooking and the crust to properly set.

Serving Suggestions for Your Homemade Baguette

Your baguette is a blank canvas for a variety of toppings. Classic combinations include butter and jam for breakfast, olive oil and balsamic vinegar for dipping, or as a side for soups and stews.

Storing and Preserving Your Baguette

For the best results, consume your baguette within a day of baking. To store it, wrap it in a paper bag or cloth and place it in a breadbox. If you want to keep it longer, wrap it tightly in plastic wrap or aluminum foil and store it at room temperature, although the crust will soften.

Common Mistakes and How to Avoid Them

Baking your first baguette may come with a learning curve. Here are some common pitfalls to be aware of:

Not Kneading Enough

If the dough isn’t properly kneaded, it will lack the proper structure for a good rise. You’ll end up with a dense baguette.

Not Scoring Properly

A bad score will look messy and, more importantly, can impact the rise and baking process.

Over-Proofing

If during the second rise, the baguette is allowed to proof for too long, it can over-expand and then deflate in the oven, resulting in a dense, flat loaf.

Variations of the Simple Baguette Recipe

You can personalize your baguette in numerous ways. Add herbs like rosemary or thyme for a savory touch, sprinkle with sea salt, or even mix olives into the dough before shaping.

Pairing Your Baguette with Other Dishes

Pair a crusty baguette with creamy cheeses, with charcuterie, or alongside a rich beef bourguignon. It’s a versatile bread that can elevate any meal.

The Joy of Baking: Personal Experiences with the Baguette Recipe

Baking is a deeply personal experience. The satisfaction of pulling a perfectly baked batch of baguettes out of the oven is unparalleled. You may face challenges, but each attempt is a learning process and another step towards mastery.

Conclusion: The Rewards of Making Your Own Baguette

Baking a baguette is more than producing sustenance; it’s about engaging in a tradition that spans centuries. The meditative process of kneading dough and the burst of flavor from each bite is a reward in itself. We hope this guide has set you on a path to enjoy the art and craft of baguette baking. Happy baking!

FAQs

Q: How long does it take to make a baguette from start to finish?

A: From mixing the dough to cooling, the process can take around 4-5 hours, with the majority of the time spent awaiting the dough to rise.

Q: Why do you need to score a baguette?

A: Scoring allows the bread to expand during baking, resulting in a better rise and a more consistent texture.

Q: Can I make a baguette without a stand mixer?

A: Yes! While a stand mixer can save time and effort in kneading, you can achieve the same results kneading by hand. It’s a good arm workout, too.

Q: How can I tell when my baguette is fully baked?

A: A fully baked baguette will be golden brown with a crust that is hard and makes a hollow sound when tapped on the bottom. The internal temperature should be around 205°F.

You may also like

Leave a Comment

SPICYRRANNY

Welcome to Spicyrranny.com – your gateway to a world of flavors! Our premium spices, sourced globally, promise an authentic taste explosion. Transform your meals from ordinary to extraordinary with our meticulously crafted spices. Try Spicyrranny experience and let your taste buds celebrate. Spicyrranny.com – Every Spice Tells a Story!

All Right Reserved. Designed and Developed by Spicyrranny Team